I’ve been obsessing over the DIY pom pom garland trend, and wanted to finally make my own! These are soooo easy to make, super affordable and make such a statement!
I created a video of this process if you’d prefer watching it in video!

WHAT YOU’LL NEED
- Yarn – I find a thicker, fluffy yarn makes for fuller pom poms!
- Scissors
- Your fingers
HOW TO MAKE A DIY POM POM GARLAND


Start by wrapping the yarn around your fingers. I like to use all 4 fingers, but 2-3 fingers would also work for a smaller pom pom!
I try to keep the yarn loose but tight enough that it stays on my hand.
The more you wrap the yarn, the fuller your DIY pom pom will become.

When you’re happy with the thickness, cut the end. You can just tuck it in, you won’t need it.

Cut another piece of yarn about 6 inches long.


Put the yarn ball on top of the 6 inch piece of yarn. Take the ends and tie them around it.
Do half the knot and then flip it over and tightly tie a full knot. You want it to be as tight as you can get it to keep your DIY pom pom together!


Begin to cut the looped ends of the yarn. You want to cut every piece except the 6 inch piece in the middle!

Once all the ends are cut, fluff it up.
At this point it will probably look a little bit lopsided + not symmetrical. That’s ok!

Trim the ends to make the pom pom more symmetrical. Start slowly by only trimming 1/4 inch off the ends.
Keep turning the pom pom to keep the shape round. It should take shape and become a nice round pom pom!
STRING YOUR DIY POM POMS
I like to use a needle + white thread for my DIY pom pom garlands! I space them apart about 2 inches.
You can also use a piece of string and hot glue your pom poms onto it!
DECORATE WITH POM POM GARLAND

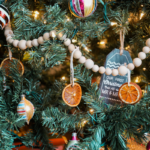
I love decorating with my DIY pom pom garland at Christmas-time, but they are cute year-round!
I paired my pom pom garland with a separate wood bead garland. You could also string these together!

POM POM GIFT WRAP
I used the leftover pom poms for holiday gift wrapping and I think they’re so cute!
I just left a few of the strings long enough so that I could tie the pom poms around the ribbon!


I hope this was helpful! Make sure to pin it for later!